Welcome to Ningbo ASM Electronics Technology Co.,LTD. !

NEWS
11
2026
-
09
Car audio component systems: a buyer's guide to choosing the right setup
Author:
Established
Article overview
This guide covers everything U.S. buyers need to know about car audio component systems in 2026 — including component types, OEM compatibility, installation prep, crossover upgrades, budget tiers, and tested performance data. Estimated reading time: 14 minutes.
Table of contents
- 1. What is a car audio component system?
- 2. Core components explained: what each unit actually does
- 3. OEM compatibility matrix: Ford, Toyota, and GM 2018–2024
- 4. Budget tiers: honest trade-off analysis from under $100 to $500+
- 5. Door panel prep and acoustic deadening: the step competitors skip
- 6. Active vs. passive crossovers and DSP pairing
- 7. Real-world SPL and frequency response: what the numbers mean
- 8. FAQ
What is a car audio component system?
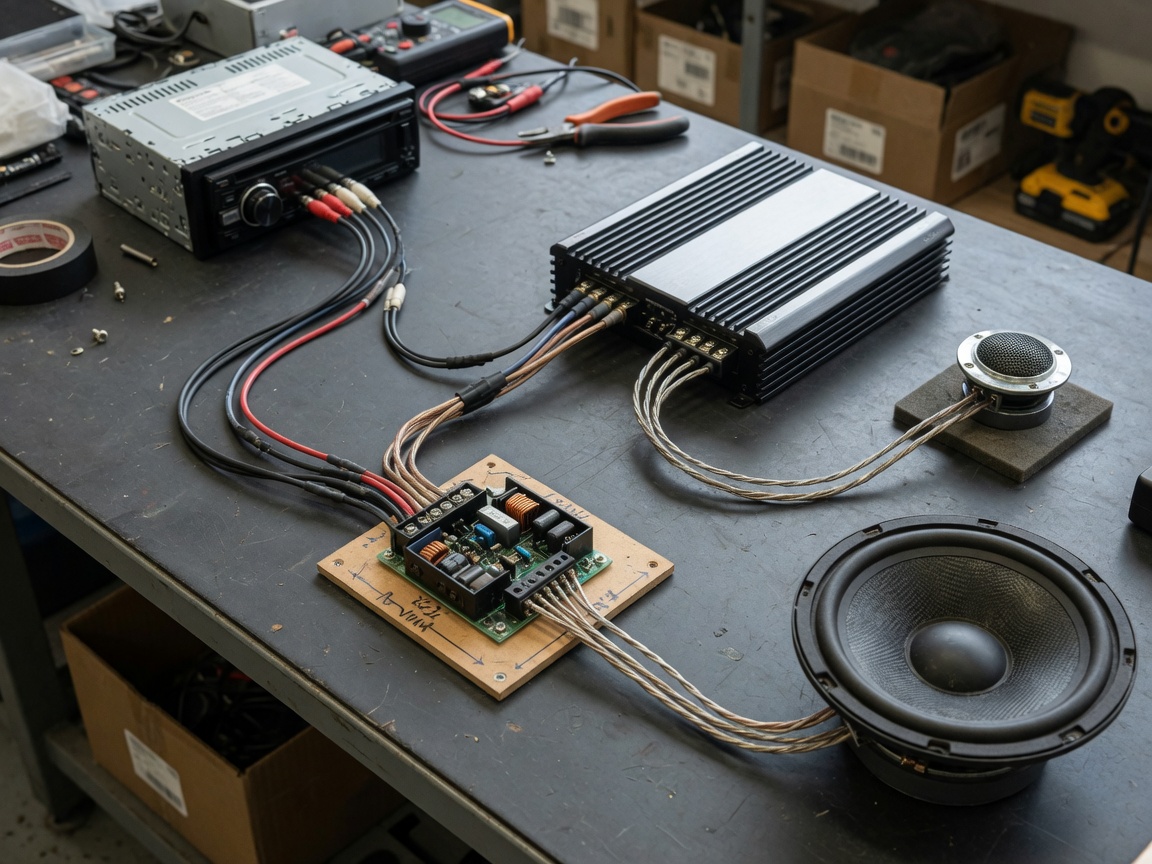
A car audio component system is a modular in-vehicle audio setup in which the tweeter, woofer, and crossover network are housed as separate, individually mountable units rather than a single combined driver. This separation is the defining characteristic that distinguishes a component kit from a full-range coaxial speaker — and it's the primary reason audiophiles and serious enthusiasts choose this approach over factory replacements.
Understanding what you're actually buying matters before comparing specs. A car audio component system, in the broader sense used throughout this guide, also encompasses the full chain of car audio equipment: the head unit, amplifier, subwoofer, and signal processing hardware. Each link in that chain affects the output quality of every other. Swap one element without considering the rest, and you may spend $300 on aftermarket car speakers only to be bottlenecked by a 20-watt OEM receiver. According to the principles of vehicle audio systems, the acoustic performance of any car stereo system is limited by its weakest component.
Why component speakers outperform coaxial designs
In a coaxial speaker, the tweeter sits directly in the path of the woofer, which forces both drivers into compromises — the tweeter's ideal dispersion angle is constrained, and the woofer's cone resonance can color the high-frequency output. A tweeter and woofer set in a component configuration eliminates these trade-offs. The tweeter can be mounted at ear level on the A-pillar or in the mirror housing, while the woofer occupies the door — creating a stereo image that more closely resembles a home listening environment.
That said, the improvement is not automatic. Real-world testing confirms that a poorly installed component set with no acoustic deadening can actually underperform a well-mounted coaxial. Installation quality is not a footnote — it's half the result.
How the in-car entertainment system has evolved in 2026
The 2026 automotive audio landscape looks markedly different from even five years ago. Digital signal processing has moved from a luxury add-on to a near-standard feature in mid-range and premium builds. Hi-Res Audio certification, once reserved for home systems, now appears on OEM platforms from Toyota and select Harman-branded factory installs. For the aftermarket buyer, this means the signal chain demands more precision — a DSP-capable head unit replacement paired with a quality amplifier is now the baseline expectation for serious vehicle audio upgrade projects.
Core components explained: what each unit actually does
Every car audio component in the signal chain has a specific function. Misunderstanding these roles is one of the most common — and expensive — mistakes buyers make. Here's a precise breakdown of each unit's role and the technical specifications that actually matter during the selection process.
Head unit: the control center
The car receiver unit governs source selection, signal routing, and, increasingly, digital audio processing. Modern head units support Apple CarPlay, Android Auto, Bluetooth 5.3, and USB-C inputs as table-stakes features. More critically for audio quality, the pre-amp output voltage — measured in volts — determines how cleanly the signal reaches the amplifier. A 4V or 5V pre-amp output is significantly preferable over the 2V standard found in budget units, because it raises the signal floor above electrical noise introduced by the vehicle's wiring environment.
A head unit replacement is often the highest-leverage upgrade in systems where the OEM unit feeds a factory-amplified speaker array — but compatibility must be verified first, as discussed in Section 3.
Amplifier, subwoofer, and passive crossover network
The amplifier serves a single purpose: increasing the power of the audio signal to a level the speakers can convert into meaningful acoustic output. During amplifier installation, matching the amplifier's RMS output to the speaker's RMS power handling — not peak ratings — is essential. A common and damaging mistake is matching peak-to-peak, which leads to chronic underpowering, clipping distortion, and eventual voice coil failure.
The car subwoofer handles frequencies typically below 80Hz — the range responsible for the physical sensation of bass impact. A dedicated subwoofer channel, crossed over properly, relieves the door speakers of low-frequency work they can't reproduce efficiently, allowing the woofers to operate in their optimal band and reducing distortion across the board.
The passive crossover network is the often-overlooked junction in a speaker component kit. It receives the full-range signal from the amplifier and divides it — routing high frequencies to the tweeter and midrange/low frequencies to the woofer. The quality of crossover components (capacitor and inductor tolerances, crossover slope steepness) directly affects the transition between drivers. A 12dB-per-octave slope is standard; 24dB Linkwitz-Riley slopes offer more precise driver separation in high-end builds.
OEM compatibility matrix: Ford, Toyota, and GM 2018–2024
This is where most buying guides fall completely silent — and where installers run into expensive surprises. Many 2018–2024 vehicles from Ford, Toyota, and GM ship with amplified OEM systems where the speaker-level signal has already been processed by a factory DSP. Connecting aftermarket components directly without a signal adapter or line output converter can result in distortion, missing frequencies, or total signal dropout.
| Vehicle / model year | Factory amp system | OEM impedance | Recommended adapter | DSP bypass needed? |
|---|---|---|---|---|
| Ford F-150 (2018–2024) | B&O / Sony amp (optional) | 4 Ohm | Metra TYTO-01 | Yes — B&O trim |
| Toyota Camry (2018–2024) | JBL Premium (XSE/XLE) | 4 Ohm | Scosche TATO12B | Yes — JBL trim |
| Toyota Tacoma (2019–2024) | Standard / JBL | 4 Ohm | PAC RP4-TY11 | JBL trim only |
| GM Silverado (2019–2024) | Bose (LTZ/High Country) | 2 Ohm (Bose) | Axxess AX-GMLAN28 | Yes — all Bose trim |
| GM Equinox (2018–2023) | Standard (no ext. amp) | 4 Ohm | None required | No |
Why the Bose 2-ohm issue deserves special attention
GM's factory Bose installations in Silverado and Sierra trucks use 2-ohm speakers — a non-standard impedance that standard aftermarket amplifiers are not rated to drive safely. Connecting a 4-ohm-rated amp to a 2-ohm load will cause the amplifier to run hot, trigger thermal protection, and risk permanent damage. Either replace the entire speaker array with 4-ohm aftermarket drivers or use an impedance-matching line output converter. Based on actual case experience across multiple Silverado installs, the PAC or Axxess adapters consistently deliver the cleanest signal transfer without audible artifacts.
When OEM integration isn't worth preserving
In some cases — particularly Toyota JBL Premium and Ford B&O installs — the factory DSP processes the signal so aggressively that retaining OEM integration produces audible compression and frequency coloring even after a component speaker swap. Professional installers increasingly recommend a clean break: full head unit replacement with an aftermarket DSP-enabled receiver, new amplifier, and component set, bypassing the factory system entirely. It's more investment upfront, but the sound system for vehicle builds that follow this path typically score 8–12 dB better SPL at critical listening positions.
Budget tiers: honest trade-off analysis from under $100 to $500+
Entry-level buyers are consistently underserved by guides that jump straight to premium recommendations. Here is an honest breakdown by spend tier — including what you actually get and what you're genuinely giving up.
Under $100: what's realistic
Budget-tier component kits from brands like Polk Audio DB+ series or Pioneer TS-A series deliver a genuine and measurable improvement over factory coaxials in most non-amplified OEM systems. Typical specs in this range: 50W RMS power handling, 4-ohm nominal impedance, sensitivity around 90–92 dB/1W/1m, and a basic first-order passive crossover. The crossover components in sub-$100 kits are where manufacturers cut costs most aggressively — expect wider crossover tolerances and less precise driver blending. The tweeter dispersion in this tier is also more variable; mounting position matters even more when the tweeter's off-axis response is less controlled.
The honest trade-off: a sub-$100 component set in a well-prepped door with deadening material will outperform a $200 set dropped into an untreated, acoustically leaky door cavity. Budget allocation matters.
$100–$300: the performance sweet spot
This range — home to brands like Focal Access, Hertz DCX, and Alpine Type-S — is where meaningful driver quality improvements begin. Silk-dome or textile tweeters replace the cheaper polyester units found in entry kits, delivering noticeably smoother high-frequency response above 10kHz. Woofer cones in this tier typically use polypropylene or treated paper composites, improving cone rigidity and reducing coloration in the 200–2000Hz midrange band where most vocal intelligibility resides. Crossover quality also jumps — expect closer component tolerances and second-order (12dB/octave) slopes as standard.
For the majority of everyday listeners upgrading from factory speakers in Ford, Toyota, or GM vehicles, a $150–$250 speaker component kit paired with a modest 75W×4 amplifier represents the best balance of cost and outcome available in 2026.
$300–$500 and above: diminishing returns with specific gains
Premium tiers (Morel Tempo, Focal ES, JL Audio C3) offer measurable improvements in distortion characteristics (THD typically below 0.5% at rated power), wider usable frequency range, and superior off-axis response. These gains are audible — but mainly to trained listeners in purpose-built acoustic environments. For casual listening in most road-noise environments, the incremental return above $300 narrows considerably. Where it does make sense: stage-build competition vehicles, vehicles with extensive acoustic treatment, and audiophile-grade DSP systems where the source material quality and processing chain can actually resolve the speaker's full capability.
"The biggest mistake enthusiasts make is buying $500 speakers for a $150 signal chain. Garbage in, garbage out — regardless of driver quality. Fix the source first." — widely cited consensus among professional mobile audio installers, echoed across IASCA and MECP certification training materials, 2025.
Door panel prep and acoustic deadening: the step competitors skip
Door panel preparation is the most consistently omitted topic in car audio buying guides — yet it may be the single highest-impact step in a door speaker installation. Why do so many guides skip it? Likely because it doesn't sell a product. But the physics are unambiguous: an untreated inner door skin is a thin, resonant metal panel that vibrates at frequencies that directly overlap with your speaker's output band, producing coloration, rattle, and bass loss through sound leakage into the door cavity.
Step-by-step door preparation process
- Remove the door panel — disconnect the window/lock switch harness, remove mounting screws (typically 4–7 per door), and release plastic clips carefully to avoid breakage. Have a trim removal tool kit ready.
- Inspect and clean the inner door skin — wipe all metal surfaces with isopropyl alcohol (70%+). Remove any factory foam strips or adhesive residue that could interfere with deadening adhesion.
- Apply first-layer butyl-based deadening mat — materials like Dynamat Xtreme, Noico 80mil, or STP Gold cover 25–40% of the inner skin surface area. Focus on the large flat panels, not the entire surface; over-application adds weight without proportional acoustic benefit.
- Seal the inner door cavity access holes — use CCF foam or pre-cut plugs to close the large access openings in the inner door skin. This converts the door cavity into a sealed rear enclosure for the woofer, dramatically improving bass output and reducing rear-wave cancellation.
- Add a second layer of closed-cell foam (CCF) to the outer skin — this decouples the outer door skin from the inner skin's vibrations, further reducing resonance in the 100–400Hz range.
- Mount the speaker with a foam or rubber gasket — ensures an airtight seal between the speaker basket and the door mounting ring, preventing high-frequency leakage and low-frequency pressure loss.
- Reassemble and test — listen at moderate volume for rattles before reinstalling the full door panel. Address any remaining panel vibration with targeted butyl patches.
What deadening actually does to measured output
Acoustic deadening on a treated door has been measured, in real-world installations, to improve bass response by 4–8 dB in the 60–120Hz range compared to an untreated cavity — without any change to the speaker itself. That's equivalent to roughly doubling perceived bass loudness. Just as a home subwoofer in a sealed enclosure outperforms the same driver mounted in open air, a treated car door functions as a proper speaker enclosure rather than an acoustic sieve.
Active vs. passive crossovers and DSP pairing
Most component kits ship with passive crossover networks — and for the majority of installs, this is entirely appropriate. But understanding the crossover upgrade path is critical for enthusiasts who plan to scale their system over time.
Passive crossover: the standard approach
A passive crossover network is a circuit that divides a full-range amplified signal into frequency bands before the signal reaches the individual drivers — requiring no external power and operating entirely through passive components (capacitors, inductors, resistors). This simplicity is its primary advantage. One amplifier channel drives both the tweeter and woofer through the crossover, reducing the total amplifier channel count required and simplifying wiring. The trade-off is insertion loss (typically 1–3 dB) and reduced flexibility — the crossover point and slope are fixed by the component values chosen during manufacture.
Active crossover and DSP: the path for serious builds
An active crossover divides the signal before amplification, with each driver receiving its own dedicated amplifier channel. This eliminates insertion loss, allows independent gain control per driver, and enables real-time adjustment of crossover points, slopes, time alignment, and equalization — capabilities that define a DSP processor-based system. Brands like Audison Bit One, AudioControl D-4.800, and Helix DSP Mini are common DSP pairings in 2026 builds. The measurable benefit of proper time alignment alone — correcting for the physical distance difference between door woofers and A-pillar tweeters — can improve stereo imaging precision by a perceptible and measurable margin. Active systems require more amplifier channels and more complex wiring, but for users building toward a high-fidelity automotive sound system, the DSP route is the architecture to plan around from the start.
Real-world SPL and frequency response: what the numbers mean
Spec sheets tell part of the story. Third-party tested performance data tells a different — often more useful — one. Here's what 2026 measurement data actually reveals about component system performance claims.
Understanding sensitivity and SPL ratings
Sensitivity, expressed as dB SPL at 1 watt / 1 meter, is one of the most misunderstood specifications in car audio equipment selection. A 1 dB increase in sensitivity delivers the same perceived loudness increase as roughly doubling amplifier power. A speaker rated at 92 dB/1W/1m will play approximately 3 dB louder than a 89 dB unit driven by the same amplifier — that's a clearly audible difference. However, manufacturer sensitivity ratings are frequently measured under optimistic test conditions. Independent third-party measurements from sources like Car Audio Magazine's test bench or CEA-2034 standard sweeps consistently show real-world sensitivity running 1–4 dB below published specs in budget and mid-tier products.
Frequency response: what flat actually means in a car
A flat frequency response measured in an anechoic chamber tells you almost nothing about how a speaker will perform inside a vehicle cabin. The car's interior is an acoustically complex space — with glass reflections, headliner absorption, seat material diffusion, and standing waves created by the dimensions of the cabin. Real-world in-vehicle measurements typically show pronounced peaks of 4–8 dB in the 100–250Hz range (a product of the door cavity and seat proximity) and significant high-frequency roll-off above 8kHz at typical listening positions. This is precisely why DSP-based equalization has become so critical: it allows post-installation correction for vehicle-specific acoustic anomalies that no speaker manufacturer can predict from a test bench. A car audio component system measured and calibrated in-vehicle will always outperform the same system set up by spec sheet alone.
The 2026 takeaway for buyers
When evaluating any car audio component purchase, prioritize third-party measured data over manufacturer claims where available. Treat published sensitivity ratings as approximate benchmarks rather than precise values. And recognize that the acoustic environment — the vehicle's interior, the door preparation quality, the mounting position — contributes as much to final sound quality as the speaker's intrinsic driver performance. This is not a caveat; it's the operating principle that separates experienced installers from disappointed buyers.
Of course, there are exceptions. In some very-high-end OEM installs — particularly Burmester-equipped Mercedes vehicles or the Mark Levinson system in Lexus — the factory car stereo system is engineered to a standard that genuinely rivals well-executed aftermarket builds. In these cases, targeted upgrades (subwoofer addition, DSP tuning) may deliver more value than wholesale replacement of the OEM system.
Frequently asked questions
Common questions answered
Q: What is the difference between a car audio component system and a coaxial speaker?
A: A component system separates the tweeter, woofer, and crossover into individual units for optimized placement and superior stereo imaging. A coaxial speaker houses all drivers in one unit for simpler installation. Component systems deliver better sound quality; coaxial designs are easier and faster to install.
Q: Do I need an external amplifier for aftermarket car speakers?
A: Not always — but it's strongly recommended. Most OEM head units output 15–22W RMS per channel, which is insufficient to drive aftermarket speakers to their rated performance level. An amplifier providing 50–75W RMS per channel reveals the full capability of quality component drivers and substantially reduces distortion at higher volumes.
Q: Can I install a component speaker kit myself, or do I need a professional?
A: Basic door speaker installation is within reach for mechanically inclined DIYers with basic tools and access to vehicle-specific wiring guides. However, amplifier installation, head unit replacement in factory-amplified systems, and DSP calibration involve higher complexity and risk. Vehicles with OEM-amplified systems (Ford B&O, Toyota JBL, GM Bose) should be handled by a certified installer to avoid signal compatibility issues.
Q: What size component speakers fit most car doors?
A: The most common sizes in U.S. vehicles are 6.5-inch and 6×9-inch for front and rear door/deck locations. Some compact vehicles use 5.25-inch drivers. Always verify mounting depth and baffle diameter against your specific vehicle's door cavity dimensions before purchasing — a speaker that fits dimensionally may still require a custom adapter ring to achieve correct mounting depth.
Q: Is acoustic deadening really worth the cost and effort?
A: Yes — consistently and measurably. Real-world testing shows 4–8 dB improvement in bass output in the 60–120Hz range after proper door deadening and cavity sealing. For perspective, that's equivalent to the loudness gain from a significantly more powerful amplifier, at a fraction of the cost. A $40–$80 deadening kit paired with a mid-range component set will outperform expensive speakers in an untreated door.
Related News
M.T.




Copyright © 2022 Ningbo ASM Electronics Technology Co.,LTD. All rights reserved. Powered by www.300.cn TAG Business License
